-
Developer portal
Developer portal
ContributeLearn
-
Specifications
Specifications
Explore specificationsReleasesAdditional resources
-
Compatible products
Compatible products
Product certification resultsGet listed
-
Community
Community
Take partCommunity contentCommunity eventsAdditional resources
-
Join us
Join us
MembershipSponsorshipContribute
-
About
About
This guide shows you how to store and retrieve data using Jakarta Persistence.
We will first begin by summarizing what we want to build. Next, we build a RESTful web service that can consume data, store it in a database using Jakarta Persistence, and serve it as a REST endpoint. For those unfamiliar with RESTful web services, we recommend reading our previous article.
We will build an application that handles coffee product data. The service will consume a JSON payload containing the product’s ID, name, and price. Here’s an example of the JSON payload:
{
  "id": 1,
  "name": "Coffee-A",
  "price": "2.75"
}
The application will store the data and provide REST endpoints for basic CRUD (Create, Read, Update, and Delete) operations. We can then further customize and improve it according to our needs.
OK, now that we have specified our requirements, you will need to follow these steps:
Set up your development environment:
- Install a Java Development Kit (JDK). Please make sure you have Java SE 11 or higher (we have tested with Java SE 11 and Java SE 17). You can choose any vendor distribution of your choice as well as from Adoptium.
- Install an application server that supports Jakarta EE. Download any of the Jakarta EE compatible products.
- Install Maven 3 or higher.
To install JDK and Maven, we can use the SDKMan. We can go through the steps mentioned in the how-to guide.
How to complete this guide
In this getting started guide, you may use Eclipse Starter for Jakarta EE, finish each step, or skip fundamental setup stages you already know. You can also begin with an IDE or choose a project structure from well-known Maven archetypes.
Create a new project with Eclipse Starter for Jakarta EE
To use Eclipse Starter for Jakarta EE, we need to take the following steps:
- Navigate to https://start.jakarta.ee. This service will set up all the
essential dependencies for an application. The current version of the
Starter only supports Maven. In the future, we may be able to choose between
Gradle and Maven.
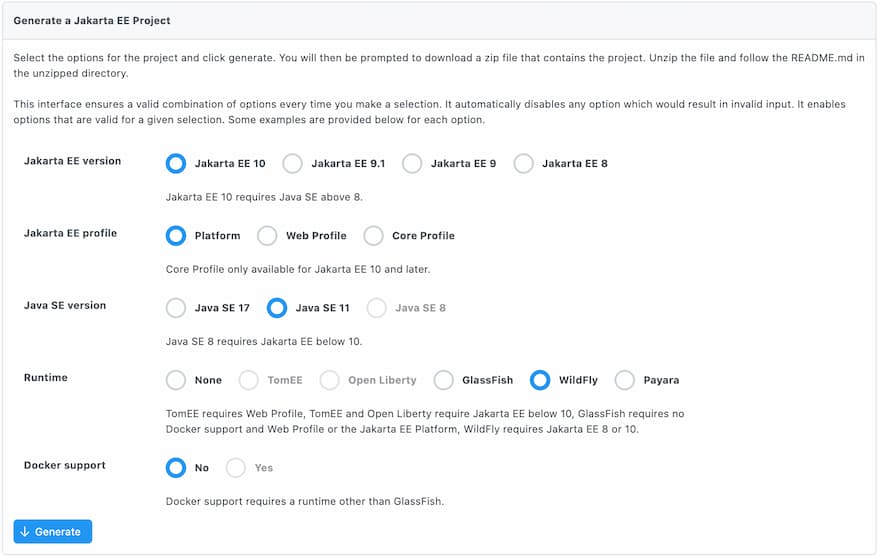
- Select the desired version of Jakarta EE from the available options. Currently, the options include Jakarta EE 8, Jakarta EE 9.1, and Jakarta EE 10. In addition, you may choose the Jakarta EE Platform or one of the Jakarta EE profiles (Web, Core).
- For this project, we have chosen Jakarta EE 10 Platform, Java SE 11 and WildFly as a Runtime.
- Once we have selected our desired options, we will click the generate button. This will give us the project structure and sample code, which we can then build and run.
Let’s explore the code structure
When we unpack the generated code, we will have a structure of an application. We can open it in our favourite IDE, and then we can just run it from the command line.
.
├── README.md
├── mvnw
├── mvnw.cmd
├── pom.xml
└── src
    └── main
        ├── java
        │   └── org
        │       └── eclipse
        │           └── jakarta
        │               └── hello
        │                   ├── Hello.java
        │                   └── HelloWorldResource.java
        └── webapp
            ├── WEB-INF
            │   └── web.xml
            ├── images
            │   └── jakartaee_logo.jpg
            └── index.html
This generated source code comes with an embedded Maven wrapper. So if you want to use it, make sure you run the following command first for Unix environments (Linux or Mac):
$ chmod +x mvnw
Since we are using WildFly as a runtime, the following command would run the application:
$ ./mvnw clean package wildfly:run
On the other hand, if you have Maven installed, you can run the following command:
$ mvn clean package wildfly:run
For Windows, we don’t need to run chmod command; rather use mvnw.cmd
instead of mvnw.
Now, if you hit the browser with the following URL, you will see the result.
http://localhost:8080/jakartaee-hello-world
We have already covered how to test them out in our previous article, so we’re skipping it.
Setting up the Jakarta Persistence
Since our goal is to start with Jakarta Persistence, let’s first understand what Jakarta Persistence essentially is. Java Persistence API is a Java programming language specification that provides an object-relational mapping (ORM) framework for managing relational data in Java applications. It simplifies database access and enables developers to work with objects and classes rather than SQL statements. It was formally known as Java Persistence API, in short, JPA.
The next step is we start by creating our first Entity. An entity is a Java class that corresponds to a table of a database. This article will use an embedded H2 database to store our data.
Create a Coffee class in the org.eclipse.jakarta.model.entity package.
package org.eclipse.jakarta.model.entity;

import jakarta.persistence.Entity;
import jakarta.persistence.GeneratedValue;
import jakarta.persistence.GenerationType;
import jakarta.persistence.Id;
import java.io.Serializable;

@Entity
public class Coffee implements Serializable {
    @Id
    @GeneratedValue(strategy = GenerationType.IDENTITY)
    private Long id;
    private String name;
    private String  price;

    //getter and setter

 }
As you can see, our Entity Class contains several annotations. The @Entity
annotation designates a Java class as an Entity class, representing a database
table where the class fields correspond to table columns. The @Id annotation
marks a field or property in the entity class as the primary key. Additionally,
you can use the @GeneratedValue annotation alongside @Id to indicate that
the primary key value should be generated automatically.
The primary idea behind the Jakarta Persistence is to allow Java programmers to work with objects. They can create instances of these entities, and Jakarta Persistence will convert them into data and store them in the database. When an object is needed, Jakarta Persistence retrieves data and converts it into an object for easy use.
How to connect the Entity to a DataSource?
Before using Jakarta Persistence, the first step is configuring the database
connection by creating a Jakarta Persistence configuration file named
persistence.xml. This file can be placed under the resources/META-INF
folder in our project.
The persistence.xml file allows specifying the JDBC Connection Settings or
the Datasource JNDI1
name. For
instance, we can use the WildFly default H2 database,
specified within the persistence.xml.
<?xml version="1.0" encoding="UTF-8" standalone="yes"?>
<persistence xmlns="https://jakarta.ee/xml/ns/persistence"
             xmlns:xsi="http://www.w3.org/2001/XMLSchema-instance"
             xsi:schemaLocation="https://jakarta.ee/xml/ns/persistence https://jakarta.ee/xml/ns/persistence/persistence_3_1.xsd"
             version="3.0">

    <persistence-unit name="coffees">
        <jta-data-source>java:jboss/datasources/ExampleDS</jta-data-source>
        <properties>
            <property
                    name="jakarta.persistence.schema-generation.database.action"
                    value="drop-and-create" />
            <property name="jakarta.persistence.sql-load-script-source"
                      value="META-INF/initial-data.sql" />
            <property name="eclipselink.logging.level.sql" value="FINE" />
            <property name="eclipselink.logging.parameters" value="true" />
            <property name="hibernate.show_sql" value="true" />
        </properties>
    </persistence-unit>
</persistence>
So create a persistence.xml file in resources/META-INF folder and copy the
above.
This persistence.xml file sets up a persistence unit named "coffees". It
specifies the JNDI name of the JDBC datasource to be used for database
connection management, which is "java:jboss/datasources/ExampleDS" by default
in WildFly for an H2 database. The configuration for JNDI name is usually
located in the standalone.xml file in the
WILDFLY_HOME/standalone/configuration directory, where WILDFLY_HOME is the
installation directory of WildFly. However, no additional configuration is
required for this example since we are using the default JNDI name. Other
runtimes may have slightly different configurations, which can be found in
their documentation.
The element contains several properties that configure the
behaviour of the Jakarta Persistence provider. For example, the
"jakarta.persistence.schema-generation.database.action" property in the
persistence.xml file specifies the action to be taken by the Jakarta
Persistence provider when generating the database schema. Some of the other
options are:
none: The Jakarta Persistence provider won’t generate the database schema.create: The Jakarta Persistence provider will create the database schema.drop: The Jakarta Persistence provider will drop the database schema.drop-and-create: The Jakarta Persistence provider will drop the existing database schema and create a new one.
There are other options available for this property as well, such as
"create-only", "drop-and-create-script", and "create-script". The choice
of the option depends on the use case and the application’s specific
requirements. For this particular case, "drop-and-create" option is chosen in
the persistence.xml file, which drops the existing database schema and creates
a new one whenever the application runs in the development environment.
The "jakarta.persistence.sql-load-script-source" property specifies the
location of the SQL script to be executed when the persistence unit is
initialized. Here, the script is located in the META-INF/initial-data.sql
file. So create a file named initial-data.sql and put the following insert
queries in it.
INSERT INTO coffee (name, price) VALUES ('Coffee-A', 2.75);
INSERT INTO coffee (name, price) VALUES ('Coffee-B', 1.99);
INSERT INTO coffee (name, price) VALUES ('Coffee-C', 3.25);
INSERT INTO coffee (name, price) VALUES ('Coffee-D', 2.99);
The purpose of this script is to ensure that when the server starts up, there is some data present in the database which can be used for testing or demonstration purposes.
Other properties are used to configure logging for the Jakarta Persistence
provider, such as "eclipselink.logging.level.sql" and
"eclipselink.logging.parameters". Finally, the "hibernate.show_sql"
property is used to enable SQL query logging for the Hibernate Jakarta
Persistence provider2
.
Setting up the Jakarta Persistence repository
We will now create a CafeRepository class that will be responsible for
handling the Create, Read, Update, and Delete (CRUD) operations on the Coffee
entity.
package org.eclipse.jakarta.model;

import jakarta.ejb.Stateless;
import jakarta.persistence.EntityManager;
import jakarta.persistence.PersistenceContext;
import org.eclipse.jakarta.model.entity.Coffee;

import java.lang.invoke.MethodHandles;
import java.util.List;
import java.util.Optional;
import java.util.logging.Logger;

@Stateless
public class CafeRepository {
    private static final Logger logger = Logger.getLogger(MethodHandles.lookup().lookupClass().getName());

    @PersistenceContext
    private EntityManager em;

    public Coffee create(Coffee coffee) {
        logger.info("Creating coffee " + coffee.getName());
        em.persist(coffee);

        return coffee;
    }

    public List<Coffee> findAll() {
        logger.info("Getting all coffee");
        return em.createQuery("SELECT c FROM Coffee c", Coffee.class).getResultList();
    }

    public Optional<Coffee> findById(Long id) {
        logger.info("Getting coffee by id " + id);
        return Optional.ofNullable(em.find(Coffee.class, id));
    }

    public void delete(Long id) {
        logger.info("Deleting coffee by id " + id);
        var coffee = findById(id)
            .orElseThrow(() -> new IllegalArgumentException("Invalid coffee Id:" + id));
        em.remove(coffee);
    }

    public Coffee update(Coffee coffee) {
        logger.info("Updating coffee " + coffee.getName());
        return em.merge(coffee);
    }
}
The class is annotated with @Stateless, which makes it a Stateless session bean.
A Stateless session bean is a type of Jakarta Enterprise Beans
(EJB) that is used for implementing business logic in Jakarta EE applications.
Stateless session beans are designed for scenarios where the bean does not need
to maintain any conversational state with the client between method
invocations. In other words, a Stateless session bean doesn’t remember any
client-specific data between method calls.
Let’s break it down step-by-step:
EntityManager:
The EntityManager
is the primary interface for managing entities in Jakarta Persistence. It is
annotated with @PersistenceContext,
which automatically injects an instance of the EntityManager into the class.
create():
This method takes a Coffee object as a parameter, logs an informational
message, and persists the object using the EntityManager. The persisted
Coffee object is returned.
findAll():
This method retrieves all the Coffee entities from the database. It creates a
Jakarta Persistence query, executes it, and returns a list of Coffee objects.
findById():
This method takes a Long id as a parameter, logs an informational message, and
searches for the Coffee entity with the specified id using the
EntityManager. If found, it returns an Optional<Coffee> containing the
entity; otherwise, it returns an empty Optional.
delete():
This method takes a Long id as a parameter, logs an informational message, and
tries to find the Coffee entity with the specified id. If found, it removes
the entity using the EntityManager. If the entity is not found, an
IllegalArgumentException is thrown with a message indicating the invalid id.
update():
This method takes a Coffee object as a parameter, logs an informational
message, and updates the existing Coffee entity in the database using the
EntityManager. The updated Coffee object is returned.
Adding REST Endpoints for the CRUD methods
Finally, we will add a REST Endpoint to be able to access our Coffee Service
from a remote REST Client.
package org.eclipse.jakarta.rest;

import jakarta.inject.Inject;
import jakarta.persistence.PersistenceException;
import jakarta.ws.rs.*;
import jakarta.ws.rs.core.Response;
import org.eclipse.jakarta.model.CafeRepository;
import org.eclipse.jakarta.model.entity.Coffee;

import java.lang.invoke.MethodHandles;
import java.util.List;
import java.util.logging.Logger;

@Path("coffees")
public class CafeResource {
    private final Logger logger = Logger.getLogger(MethodHandles.lookup().lookupClass().getName());

    @Inject
    private CafeRepository cafeRepository;

    @GET
    @Path("{id}")
    @Produces("application/json")
    public Coffee findCoffee(@PathParam("id") Long id) {
        logger.info("Getting coffee by id " + id);
        return cafeRepository.findById(id)
            .orElseThrow(() -> new WebApplicationException(Response.Status.NOT_FOUND));
    }

    @GET
    @Produces("application/json")
    public List<Coffee> findAll() {
        logger.info("Getting all coffee");
        return cafeRepository.findAll();
    }

    @POST
    @Consumes("application/json")
    @Produces("application/json")
    public Coffee create(Coffee coffee) {
        logger.info("Creating coffee " + coffee.getName());
        try{
            return cafeRepository.create(coffee);
        }catch (PersistenceException ex){
            logger.info("Error creating coffee " + coffee.getName());
            throw new WebApplicationException(Response.Status.BAD_REQUEST);
        }
    }

    @DELETE
    @Path("{id}")
    public void delete(@PathParam("id") Long id) {
        logger.info("Deleting coffee by id " + id);
        try{
            cafeRepository.delete(id);
        }catch (IllegalArgumentException e){
            logger.info("Error deleting coffee by id " + id);
            throw new WebApplicationException(Response.Status.NOT_FOUND);
        }
    }


    @PUT
    @Consumes("application/json")
    @Produces("application/json")
    public Coffee update(Coffee coffee) {
        logger.info("Updating coffee " + coffee.getName());
        try{
            return cafeRepository.create(coffee);
        }catch (PersistenceException ex){
            logger.info("Error updating coffee " + coffee.getName());
            throw new WebApplicationException(Response.Status.BAD_REQUEST);
        }
    }
}
The CafeResource class is a RESTful web service for managing Coffee entities
using the Jakarta RESTful Web Services. The class exposes various HTTP
endpoints for performing CRUD operations, such as creating, retrieving,
updating, and deleting Coffee objects.
@Path("coffees"): This annotation sets the base path of the web service to"/coffees". All the HTTP endpoints in this class will be relative to this path.@Inject: This annotation is used to inject an instance of theCafeRepositoryclass, which handles the persistence operations for Coffee entities.@GET,@POST,@PUT,@DELETE: These annotations define the HTTP methods for the corresponding methods in the class (e.g.,findCoffee(),findAll(),create(),delete(), andupdate()). They map the Java methods to HTTP operations.@Path("{id}"): This annotation is used in combination with the@GETand@DELETEannotations to specify the path parameter “id” for retrieving or deleting aCoffeeentity by its id.@Producesand@Consumes: These annotations are used to define the media type (e.g.,"application/json") that a method can produce as a response or consume as input. In this case, the methods accept and return JSON representations ofCoffeeentities.
The class also utilizes the Logger for logging informational messages and
handles exceptions by throwing WebApplicationException
with appropriate HTTP status codes (e.g., Response.Status.NOT_FOUND
or Response.Status.BAD_REQUEST)
in case of errors.
Let’s test the Service
After adding the aforementioned classes to your project, execute the following command to build and run the application:
$ mvn clean package wildfly:run
This command will clean any previous builds, compile and package the application, and then deploy it to the WildFly application server.
If everything is set up correctly, the application will be accessible through a web browser or a REST client. You can use cURL as a command-line REST client to interact with the service.
Here are the cURL commands for the different CRUD operations in the CafeResource class, using the provided base URL and JSON payload:
Create a new Coffee entity (HTTP POST):
curl -X POST \
 http://localhost:8080/jakartaee-hello-world/rest/coffees \
 -H 'Content-Type: application/json' \
 -d '{
 "id": 1,
 "name": "Coffee-A",
 "price": "2.75"
}'
Retrieve all Coffee entities (HTTP GET):
curl -X GET \
 http://localhost:8080/jakartaee-hello-world/rest/coffees \
 -H 'Content-Type: application/json'
Retrieve a specific Coffee entity by id (HTTP GET):
curl -X GET \
 http://localhost:8080/jakartaee-hello-world/rest/coffees/<id> \
 -H 'Content-Type: application/json'
Update an existing Coffee entity (HTTP PUT):
curl -X PUT \
 http://localhost:8080/jakartaee-hello-world/rest/coffees \
 -H 'Content-Type: application/json' \
 -d '{
 "id": 1,
 "name": "Coffee-A",
 "price": "2.75"
}'
Delete a Coffee entity by id (HTTP DELETE):
curl -X DELETE \
 http://localhost:8080/jakartaee-hello-world/rest/coffees/<id> \
 -H 'Content-Type: application/json'
Make sure to replace the placeholder with the actual id value when using
the cURL commands for retrieving or deleting a specific Coffee entity.
Conclusion
Congratulations! You have just learned how to develop a web service using Jakarta Persistence.
- The Java Naming and Directory Interface (JNDI) is a Java API for a directory service that allows Java software clients to discover and look up data and objects via a name.
- Jakarta Persistence is a Java ORM specification with multiple compatible implementations, such as EclipseLink 3.0.0 and Hibernate ORM 6.0.0.Final.