-
Developer portal
Developer portal
ContributeLearn
-
Specifications
Specifications
Explore specificationsReleasesAdditional resources
-
Compatible products
Compatible products
Product certification resultsGet listed
-
Community
Community
Take partCommunity contentCommunity eventsAdditional resources
-
Join us
Join us
MembershipSponsorshipContribute
-
About
About
This guide aims to walk you through the process of building a simple Servlet application using Jakarta Servlet. We’ll start by outlining what we aim to achieve and then step-by-step guide you through setting up your environment, writing code, and deploying the Servlet application. If you’re new to Servlets or Jakarta EE, this guide should be a great starting point.
We’ll develop an application that accomplishes the following:
- Presents a form asking the user to select their coffee preferences (e.g., black, latte, cold brew).
- Stores these preferences in a session.
- Dynamically generates a “Coffee Dashboard,” displaying personalized coffee recommendations.
OK, now that we have specified our requirements, you will need to follow these steps:
Set up your development environment:
- Install a Java Development Kit (JDK). Please make sure you have Java SE 11 or higher (we have tested with Java SE 11 and Java SE 17). You can choose any vendor distribution of your choice as well as from Adoptium.
- Install an application server that supports Jakarta EE. Download any of the Jakarta EE-compatible products.
- Install Maven 3 or higher
To install JDK and Maven, we can use the SDKMan. We can go through the steps mentioned in the how-to guide.
How to complete this guide
In this getting started guide, you may use Eclipse Starter for Jakarta EE, finish each step, or skip fundamental setup stages you already know. You can also begin with an IDE or choose a project structure from well-known Maven archetypes.
Create a new project with Eclipse Starter for Jakarta EE
To use Eclipse Starter for Jakarta EE, we need to take the following steps:
- Navigate to https://start.jakarta.ee. This service will set up all the
essential dependencies for an application. The current version of the
Starter only supports Maven. In the future, we may be able to choose between
Gradle and Maven.
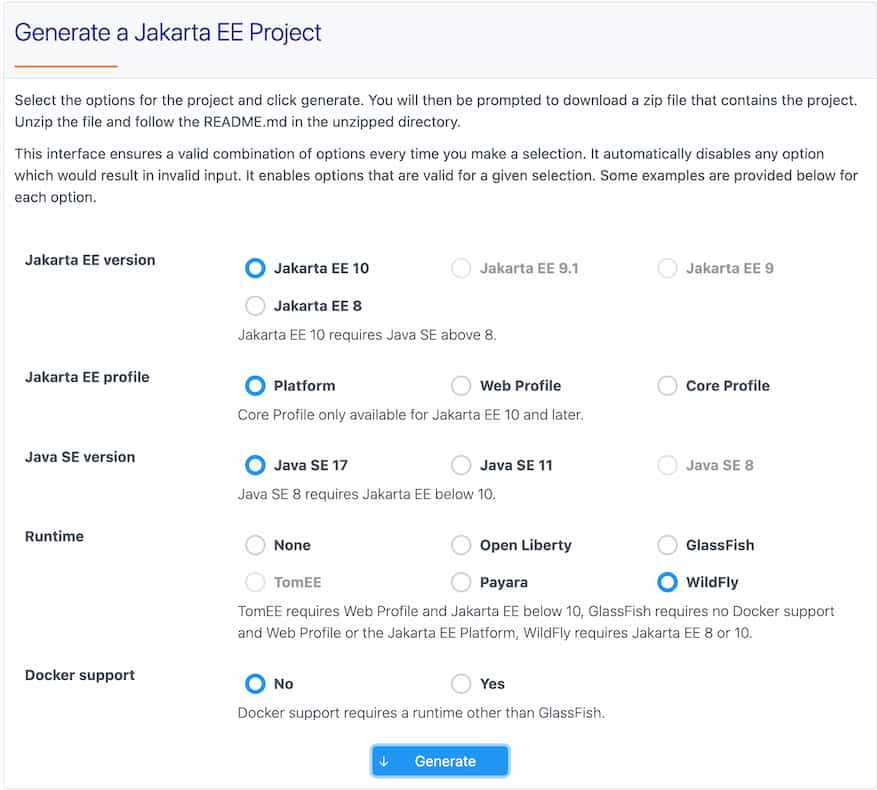
- Select the desired version of Jakarta EE from the available options. Currently, the options include Jakarta EE 8, Jakarta EE 9.1, and Jakarta EE 10. In addition, you may choose the Jakarta EE Platform or one of the Jakarta EE profiles (Web, Core).
- For this project, we have chosen Jakarta EE 10 Platform, Java SE 17 and WildFly as a Runtime.
- Once we have selected our desired options, we will click the generate button. This will give us the project structure and sample code, which we can then build and run.
Let’s explore the code structure
When we unpack the generated code, we will have the structure of an application. We can open it in our favourite IDE, and then we can just run it from the command line.
.
├── README.md
├── mvnw
├── mvnw.cmd
├── pom.xml
└── src
    └── main
        ├── java
        │   └── org
        │       └── eclipse
        │           └── jakarta
        │               └── hello
        │                   ├── Hello.java
        │                   └── HelloWorldResource.java
        └── webapp
            ├── WEB-INF
            │   └── web.xml
            ├── images
            │   └── jakartaee_logo.jpg
            └── index.html
This generated source code comes with an embedded Maven wrapper. So if you want to use it, make sure you run the following command first for Unix environments (Linux or Mac):
$ chmod +x mvnw
Since we are using WildFly as a runtime, the following command would run the application:
$ ./mvnw clean package wildfly:run
On the other hand, if you have Maven installed, you can run the following command:
$ mvn clean package wildfly:run
For Windows, we don’t need to run chmod command; rather use mvnw.cmd
instead of mvnw.
Now, if you hit the browser with the following URL, you will see the result.
http://localhost:8080/jakartaee-hello-world
We have already covered how to test them out in our previous article, so we’re skipping it.
Setting up the Jakarta Servlet
As we aim to kick off our journey with Jakarta Servlets, let’s first grasp the essence of what Jakarta Servlets are all about. Originally part of the Java EE ecosystem and previously known as Java Servlets, Jakarta Servlets are a set of APIs in the Jakarta EE platform that enable server-side Java applications to handle HTTP requests and responses. Unlike traditional methods of dealing directly with low-level socket programming, Jakarta Servlets provides a high-level, component-based approach to building web applications. This makes it easier for developers to focus on business logic, as the underlying protocol handling and lifecycle management are taken care of by the Jakarta Servlet API.
The
HttpServlet
interface plays a pivotal role in the Jakarta Servlet API, serving as the
cornerstone for creating HTTP-specific servlets. It is an abstract class that
extends the
GenericServlet
class and provides methods like doGet(), doPost(), doPut(), etc., to
handle various types of HTTP requests. When you create a custom servlet, you
typically extend the HttpServlet class and override these methods to define
the behaviour of your servlet for each HTTP request method.
Creating your own servlet involves a few straightforward steps. First, create a
new Java class that extends HttpServlet. Then, override the HTTP methods you
want your servlet to handle-commonly doGet() for handling GET requests and
doPost() for POST requests. For example, to create a simple servlet that
returns a “Hello, World!” message for GET requests, you’d extend HttpServlet
and override the doGet() method like so:
import jakarta.servlet.*;
import jakarta.servlet.annotation.WebServlet;
import jakarta.servlet.http.*;
import java.io.IOException;
import java.io.PrintWriter;

@WebServlet("/hello")
public class HelloWorldServlet extends HttpServlet {
    @Override
    protected void doGet(HttpServletRequest req, HttpServletResponse resp) throws ServletException, IOException {
        PrintWriter out = resp.getWriter();
        out.println("Hello, World!");
    }
}
The
@WebServlet
annotation is a key feature in modern Jakarta Servlets, used to define the
configuration and URL mapping of a Servlet class. When you see
@WebServlet("/hello") above a class definition, it signifies that this
particular Servlet will respond to HTTP requests that target the /hello path
within your application’s context root.
Now, if we compile and rerun the application and hit the following URL on the browser, we will be able to see the output.
http://localhost:8080/jakartaee-hello-world/hello
Now that we have accomplished writing a simple hello world servlet application let’s go ahead and try a bit more complex one.
Steps to Create Coffee Servlets
1. Create the Coffee Preferences HTML Form
First, create an HTML file named coffee_preferences.html that includes
checkboxes for various coffee types. Place the file in the WEB-INF folder.
<!DOCTYPE html>
<html>
  <head>
     <title>Coffee Preferences</title>
  </head>
  <body>
    <form action="storePreferences" method="post">
       <p>Select your coffee preferences:</p>
       <input type="checkbox" name="coffeeType" value="Black"> Black<br>
       <input type="checkbox" name="coffeeType" value="Latte"> Latte<br>
       <input type="checkbox" name="coffeeType" value="Cold Brew"> Cold Brew<br>

       <input type="submit" value="Submit">
    </form>
  </body>
</html>
The WEB-INF folder in a Jakarta EE or Java EE web application serves as a
secure directory to store resources that should not be directly accessible by
clients. When you place HTML files (or any other web resources like JSPs) in
the WEB-INF folder, they become inaccessible via a direct URL request from
the client’s browser. This provides an additional layer of security for
application resources that should only be accessible through Servlets or other
server-side components.
2. Create the Servlet to Store Preferences
Now, let’s create a Servlet that serves the coffee_preferences.html and
captures the selected coffee types and stores them in a session.
package org.eclipse.jakarta.hello;

import jakarta.servlet.*;
import jakarta.servlet.annotation.WebServlet;
import jakarta.servlet.http.*;

import java.io.IOException;

@WebServlet("/storePreferences")
public class StorePreferencesServlet extends HttpServlet {

   @Override
   protected void doGet(HttpServletRequest req, HttpServletResponse resp) throws ServletException, IOException {
       req.getRequestDispatcher("/WEB-INF/coffee_preferences.html").forward(req, resp);
   }

   @Override
   protected void doPost(HttpServletRequest req, HttpServletResponse resp) throws ServletException, IOException {
       String[] coffeeTypes = req.getParameterValues("coffeeType");
       HttpSession session = req.getSession();
       session.setAttribute("userCoffeeTypes", coffeeTypes);

       resp.sendRedirect("coffeeDashboard");
   }
}
The Jakarta Servlet, StorePreferencesServlet, is written to handle both the
displaying and storing of user coffee preferences. The Servlet is mapped to the
/storePreferences URL via the @WebServlet annotation. The doGet method
forwards the request to an HTML page located at
/WEB-INF/coffee_preferences.html, which contains the form for users to select
their coffee preferences. The doPost method, on the other hand, captures the
user’s coffee preferences from the submitted form. These preferences are stored
as an array of strings in an HTTP session under the attribute name
userCoffeeTypes. Once the preferences are stored, the user is redirected to
the coffeeDashboard servlet.
3. Create the Servlet to Generate Personalized Coffee Recommendations
Now, let’s create another Servlet that reads the stored coffee preferences and dynamically generates a list of recommended coffee.
package org.eclipse.jakarta.hello;
import jakarta.servlet.*;
import jakarta.servlet.annotation.WebServlet;
import jakarta.servlet.http.*;
import java.io.IOException;
import java.io.PrintWriter;
import java.util.HashMap;
import java.util.Map;
@WebServlet("/coffeeDashboard")
public class CoffeeDashboardServlet extends HttpServlet {
//This could ideally come from a database
private static final Map<String, String> COFFEE_DESCRIPTIONS = new HashMap<>();
static {
COFFEE_DESCRIPTIONS.put("Black", """
<p>Black coffee has a robust flavor, perfect for those who prefer a coffee with some bite.</p>
<p>Try brewing methods like French Press or Aeropress for an enjoyable black coffee experience.</p>
""");
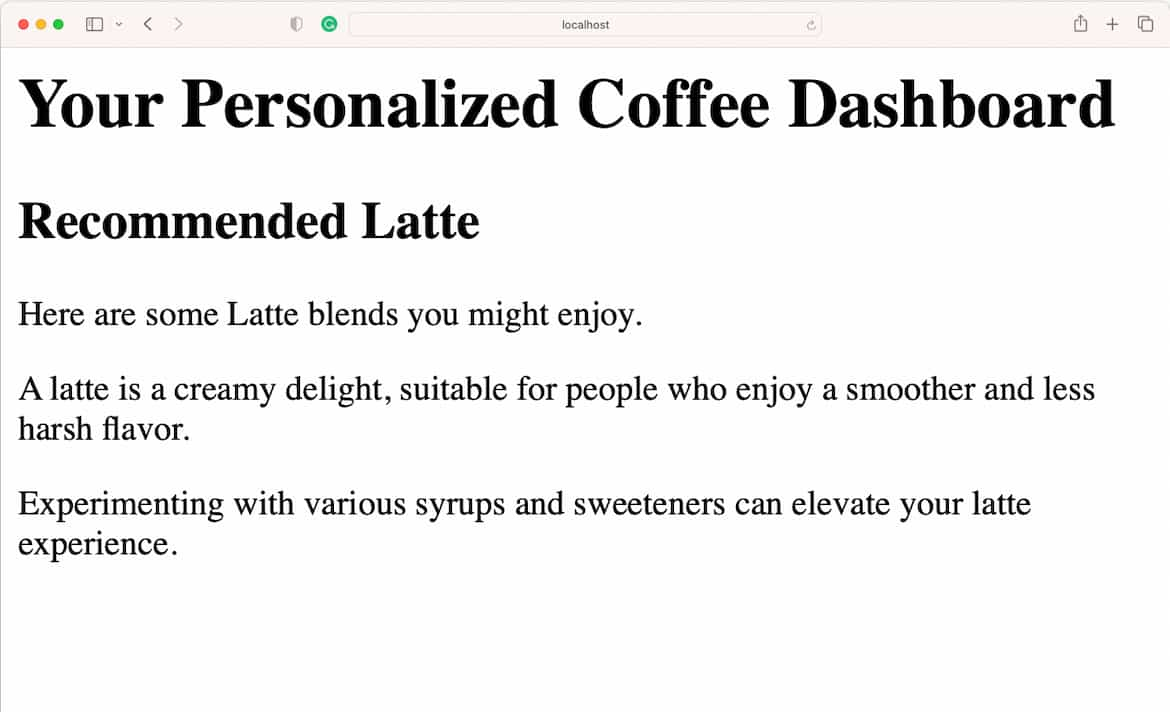
COFFEE_DESCRIPTIONS.put("Latte", """
<p>A latte is a creamy delight, suitable for people who enjoy a smoother and less harsh flavor.</p>
<p>Experimenting with various syrups and sweeteners can elevate your latte experience.</p>
""");
COFFEE_DESCRIPTIONS.put("Cold Brew", """
<p>Cold brew coffee tends to be smoother and less acidic. It's perfect for those hot summer days.</p>
<p>Try brewing a batch in the fridge overnight for a refreshing morning pick-me-up.</p>
""");
}
@Override
protected void doGet(HttpServletRequest req, HttpServletResponse resp) throws ServletException, IOException {
HttpSession session = req.getSession();
String[] coffeeTypes = (String[]) session.getAttribute("userCoffeeTypes");
if (coffeeTypes == null || coffeeTypes.length == 0) {
handleNoCoffeeTypes(resp);
return;
}
PrintWriter out = resp.getWriter();
out.println("""
<html>
<body>
<h1>Your Personalized Coffee Dashboard</h1>
""");
for (String coffeeType : coffeeTypes) {
String additionalInfo = COFFEE_DESCRIPTIONS.get(coffeeType);
out.println("""
<h2>Recommended %s</h2>
<p>Here are some %s blends you might enjoy.</p>
%s
""".formatted(coffeeType, coffeeType, additionalInfo));
}
out.println("""
</body>
</html>
""");
}
private void handleNoCoffeeTypes(HttpServletResponse resp) throws IOException {
PrintWriter out = resp.getWriter();
out.println("""
<html>
<body>
<h1>No Coffee Types Found</h1>
<p>Please select at least one type of coffee.</p>
</body>
</html>
""");
}
}
The CoffeeDashboardServlet class generates a personalized coffee dashboard
based on the user’s coffee preferences. The Servlet is mapped to the URL
/coffeeDashboard via the @WebServlet annotation. It employs a static
HashMap named COFFEE_DESCRIPTIONS to store descriptions for different types
of coffee—this is a stand-in for what could ideally be fetched from a database.
The servlet overrides the doGet method to handle HTTP GET requests. Inside
this method, it first retrieves the user’s coffee preferences stored in an HTTP
session. If no preferences are found, a default message is displayed by calling
the handleNoCoffeeTypes method. Otherwise, it iterates through the selected
coffee types and fetches their corresponding descriptions from the
COFFEE_DESCRIPTIONS map. Finally, it generates HTML content to display this
information in a personalized dashboard.
That’s it. Our application is done; now, we can rerun it again and test it out.
Testing out the application
Once deployed, open a web browser and navigate to: http://localhost:8080/jakartaee-hello-world/storePreferences
It will open the following page:
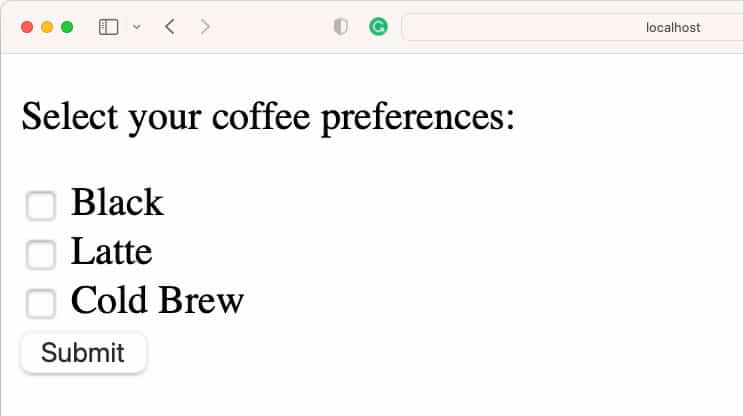
Choose your preferred coffee type and hit the ‘Submit’ button; you’ll then be directed to the subsequent page.
Conclusion
Congratulations! You have just learned how to develop an application with Jakarta Servlet.