-
Developer portal
Developer portal
ContributeLearn
-
Specifications
Specifications
Explore specificationsReleasesAdditional resources
-
Compatible products
Compatible products
Product certification resultsGet listed
-
Community
Community
Take partCommunity contentCommunity eventsAdditional resources
-
Join us
Join us
MembershipSponsorshipContribute
-
About
About
This guide shows you how to secure a rest endpoint using Jakarta Authentication.
As we delve into securing RESTful web services, let’s first define a basic scenario that we will be working with throughout this article.
We are constructing a service that will accept an HTTP GET request at http://localhost:8080/jakartaee-hello-world/rest/hello. In response to this request, our service will return a JSON payload, as shown in the following example:
{
  "hello": "world"
}
In this article, we will secure this endpoint.
Over time, this service can be further enhanced and customized to fit more complex requirements and situations. By starting with this simple setup, we can get a better grasp of the fundamental steps involved in securing a RESTful web service using Jakarta EE. Now, let’s proceed with those steps. For those unfamiliar with RESTful web services, we recommend reading our previous article.
Set up your development environment:
- Install a Java Development Kit (JDK). Please make sure you have Java SE 11 or higher (we have tested with Java SE 11 and Java SE 17). You can choose any vendor distribution of your choice as well as from Adoptium.
- Install an application server that supports Jakarta EE. Download any of the Jakarta EE-compatible products.
- Install Maven 3 or higher.
To install JDK and Maven, we can use the SDKMan. We can go through the steps mentioned in the how-to guide.
How to complete this guide
In this getting started guide, you may use Eclipse Starter for Jakarta EE, finish each step, or skip fundamental setup stages you already know. You can also begin with an IDE or choose a project structure from well-known Maven archetypes.
Create a new project with Eclipse Starter for Jakarta EE
To use Eclipse Starter for Jakarta EE, we need to take the following steps:
- Navigate to https://start.jakarta.ee. This service will set up all the
essential dependencies for an application. The current version of the
Starter only supports Maven. In the future, we may be able to choose between
Gradle and Maven.
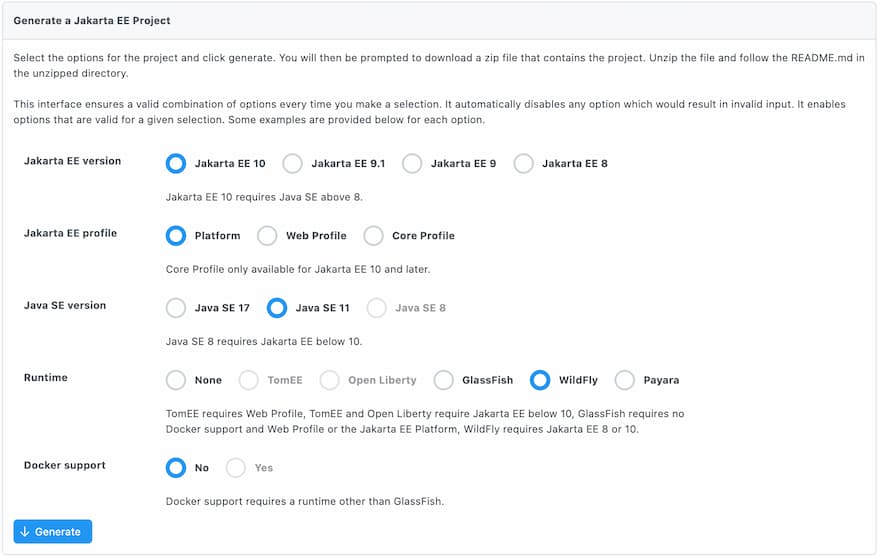
- Select the desired version of Jakarta EE from the available options. Currently, the options include Jakarta EE 8, Jakarta EE 9.1, and Jakarta EE 10. In addition, you may choose the Jakarta EE Platform or one of the Jakarta EE profiles (Web, Core).
- For this project, we have chosen Jakarta EE 10 Platform, Java SE 11 and WildFly as a Runtime.
- Once we have selected our desired options, we will click the generate button. This will give us the project structure and sample code, which we can then build and run.
Let’s explore the code structure
When we unpack the generated code, we will have a structure of an application. We can open it in our favourite IDE, and then we can just run it from the command line.
.
├── README.md
├── mvnw
├── mvnw.cmd
├── pom.xml
└── src
    └── main
        ├── java
        │   └── org
        │       └── eclipse
        │           └── jakarta
        │               └── hello
        │                   ├── Hello.java
        │                   └── HelloWorldResource.java
        └── webapp
            ├── WEB-INF
            │   └── web.xml
            ├── images
            │   └── jakartaee_logo.jpg
            └── index.html
This generated source code comes with an embedded Maven wrapper. So if you want to use it, make sure you run the following command first for Unix environments (Linux or Mac):
$ chmod +x mvnw
Since we are using WildFly as a runtime, the following command would run the application:
$ ./mvnw clean package wildfly:run
On the other hand, if you have Maven installed, you can run the following command:
$ mvn clean package wildfly:run
For Windows, we don’t need to run chmod command; rather use mvnw.cmd
instead of mvnw.
Now, if you hit the browser with the following URL, you will see the result.
http://localhost:8080/jakartaee-hello-world
We have already covered how to test them out in our previous article, so we’re skipping it.
Setting up the Jakarta Authentication
The first step in securing your RESTful web service is to authenticate the user making the request. In Jakarta EE, this can be achieved using Jakarta Authentication Specification. This Specification can be used to set up various forms of authentication, including basic, form-based, digest, and token-based authentication.
Authentication
Let’s consider basic authentication. To set this up, we’d need to configure your web.xml file with the following:
<security-constraint>
   <web-resource-collection>
      <web-resource-name>Protected REST Services</web-resource-name>
      <url-pattern>/rest/*</url-pattern>
   </web-resource-collection>
   <auth-constraint>
      <role-name>user</role-name>
   </auth-constraint>
</security-constraint>

<login-config>
   <auth-method>BASIC</auth-method>
   <realm-name>ApplicationRealm</realm-name>
</login-config>

<security-role>
   <role-name>user</role-name>
</security-role>
It sets up basic authentication for the application and protects resources
under the /rest path.
Let’s break it down:
- Security Constraint: This is used to define the access control rules for
a specific set of web resources.
- Web Resource Collection: The
<web-resource-collection>tag is used to group URLs to apply security constraints. In this configuration, the web resource collection is named ‘Protected REST Services’, and it applies to all URLs under the/restpath, as defined by<url-pattern>/rest/*</url-pattern>. - Auth Constraint: The
<auth-constraint>tag is used to define the roles that are allowed to access the URLs defined in the web resource collection. Here, only users with the'user'role are allowed access.
- Web Resource Collection: The
- Login Config: This tag is used to define the authentication method that
the server should use. In this case, it’s set to BASIC, which means HTTP
Basic Authentication will be used. The
<realm-name>is set toApplicationRealm, which is the realm used by the server for authentication. - Security Role: Finally, the
<security-role>tag is used to define roles that can be used in the web application. In this case, the role of ‘user’ is defined. Note that the names used in the<role-name>tags need to match the roles defined in the server or in your application’s security setup.
Authorization
Once authentication is successful, the next step is authorization. Authorization is the process of determining whether the authenticated entity has the right to access the desired resources or perform a certain action.
Jakarta EE uses role-based access control (RBAC) for authorization. In RBAC, access decisions are based on the roles that individual users have as part of the system. An entity’s roles are verified against the security constraints defined in the deployment descriptor of the application.
Jakarta EE provides several annotations to secure your applications:
@RolesAllowed:indicates which security roles are allowed to invoke the specified methods.@DenyAll:specifies that no security roles are allowed to invoke the specified methods.@PermitAll:specifies that all security roles are allowed to invoke the specified methods.@RunAs:defines the security identity for executing the specified methods.
Now let’s secure our endpoint. To do that, we have just to make the following
change in the HelloWorldResource:
@Path("hello")
public class HelloWorldResource {

   @GET
   @RolesAllowed("user")
   @Produces({ MediaType.APPLICATION_JSON })
   public Hello hello(@QueryParam("name") String name) {
      if ((name == null) || name.trim().isEmpty())  {
         name = "world";
      }

      return new Hello(name);
   }
}
In this article, we are using @RolesAllowed annotation to secure this
endpoint.
If we run the application, our endpoint will be secured. Let’s try it out.
$ curl -v http://localhost:8080/jakartaee-hello-world/rest/hello
This will produce the following results:
* Trying 127.0.0.1:8080...
* Connected to localhost (127.0.0.1) port 8080 (#0)
> GET /jakartaee-hello-world/rest/hello HTTP/1.1
> Host: localhost:8080
> User-Agent: curl/7.87.0
> Accept: */*
>
* Mark bundle as not supporting multiuse
< HTTP/1.1 401 Unauthorized
< Expires: 0
< Connection: keep-alive
< WWW-Authenticate: Basic realm="ApplicationRealm"
< Cache-Control: no-cache, no-store, must-revalidate
< Pragma: no-cache
< Content-Type: text/html;charset=UTF-8
< Content-Length: 71
< Date: Wed, 05 Jul 2023 01:18:44 GMT
<
* Connection #0 to host localhost left intact
<html><head><title>Error</title></head><body>Unauthorized</body></html>
As we can see, our curl command receives a 401 Unauthorized response because it lacks valid authentication credentials for the requested resource.
The next step is to create a credential so that we can access this endpoint securely.
Defining Users
In WildFly, the application-users.properties and
application-roles.properties files are typically located in the
standalone/configuration directory of your WildFly installation. Since we are
using embedded WildFly, to find this folder, we have to navigate to
target/server/standalone/configuration folder.
application-users.properties is used to define users and their passwords
(hashed), while application-roles.properties is used to map users to roles.
Here’s how to do it:
- Navigate to the WildFly bin (
/target/server/bin) folder. - Use the
add-user.sh(oradd-user.batfor Windows) script to create a new user.
The script will guide you through the process of adding a new user:
$ ./add-user.sh
Follow the prompts:
What type of user do you wish to add?
 a) Management User (mgmt-users.properties)
 b) Application User (application-users.properties)
(a): b

Enter the details of the new user to add.
Using realm 'ApplicationRealm' as discovered from the existing property files.
Username : your_username
Password : your_password
Re-enter Password : your_password
What roles do you want this user to belong to? (Please enter a comma separated list, or leave blank for none)[  ]: your_role
These are the simple steps to define users and roles in WildFly. Restart the WildFly server to ensure your changes take effect.
However, we have to be sure, this time, we don’t use clean the target folder while running from maven. Because the maven clean command removes the target folder altogether, and our user creation will be lost.
So simply run without clean:
./mvnw package wildfly:run
Now let’s run the curl command again:
curl --user username:password http://localhost:8080/jakartaee-hello-world/rest/hello
Replace the username and password you configured on add-user.sh prompt.
If username and password are correct, then we will get the following output.
{
  "hello": "world"
}
Conclusion
Congratulations! You have just learned how to secure a rest endpoint using Jakarta Authentication. While this is a crucial starting point, real-world applications typically store user and role data in databases or LDAP servers rather than in properties files. Be aware that security is multifaceted and encompasses aspects such as HTTPS utilization and database protection. For a comprehensive understanding, it’s recommended to refer to the official Jakarta EE security documentation and explore other relevant resources online.